In this blog post, you will learn how to destress at your desk using breathwork, self-massage, and stretches.
Destress At Your Desk
Destress at Your Desk with Breathwork
Monks from Eastern traditions were essentially scientists. They recognized that a wild mind could affect our health, so they used meditation techniques to relieve stress so that they can stay in balance throughout the day.
Whenever you start to feel irritated or stressed out, you can use Vagal Tone Breathing to help boost the relaxation response of your parasympathetic nervous system to calm you down.

To do it, you want to take slow, relaxed, full breaths in through your nose for four seconds and then exhale through your mouth for eight seconds.
Shrug your shoulders in sync with your breath. So when you move your shoulders up with the inhale and on the exhale, roll them back and down, squeezing your shoulder blades together.
Now, as you breathe, it’s okay if your mind starts to wander and you stop focusing on your breath, just become aware of it, and then come back to the breath and focus on it again. This is the essence of mindfulness—attention to awareness with acceptance.
Practice this vagal tone breathing exercise at least three times to help you feel more balanced and focused throughout your workday.
Remember to inhale through your nose for four seconds and exhale through your mouth for eight seconds.
Destress at Your Desk with Self Massage & Stretches
Now, let’s transition into the self-massage and stretching component of the Destress at your Desk routine.
Download this cheat sheet so you can follow along with the video as you practice the four self-massage techniques and five stretches.
Massage Technique #1: Rake & Twist
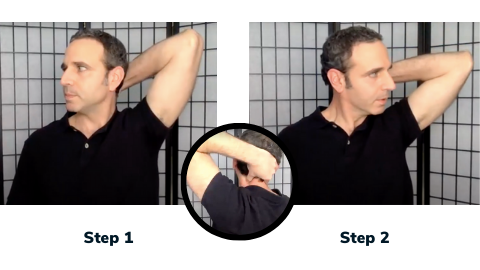
Step 1:
- Place your left hand on the back of your neck. Turn your head to the right.
- Underneath the tips of your fingers are the suboccipitals.
Step 2:
- Take a deep breath in and exhale as you tighten and rake (drag) your fingers across the back of your neck while you turn your head to the left (toward your elbow).
- Maintain tension in your fingertips as you perform the rake move. Move down the back of your neck and stop when you reach the shoulders.
Repeat this rake-and-twist technique three times or until you feel a loosening of the posterior neck musculature. Repeat on the other side of the neck, using the right hand on the left side of your neck.
Massage Technique #2: Lobster Claw
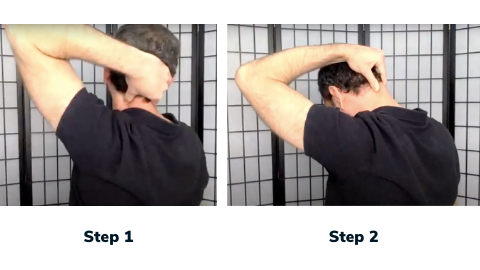
Step 1:
- Like lioness grips the nap of its cub’s neck, you look up and grasp the back of your neck.
Step 2:
- Take a deep breath in and exhale as you pull the muscle tissue away as you look down, pinching your fingers together like a lobster claw.
- As you nod your head down, try to bring your chin to your chest.
Repeat several times and then switch sides.
Massage Technique #3: Pinch, Lift & Lateral Flex
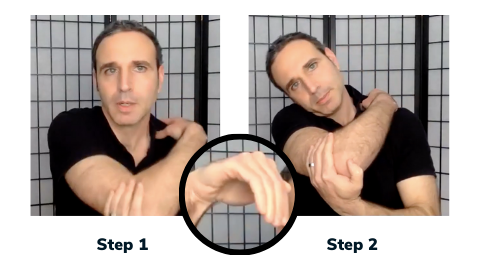
Step 1:
- Grip your upper trap with the fingers of your opposite hand.
- Cradle your elbow with your palm to support it.
- Squeeze the trap and lift the muscle tissue a bit
Step 2:
- Take a deep breath in and exhale as you laterally flex your neck, bringing your ear towards your shoulder for a few seconds, stretching that muscle tissue.
- Rotate your head.
Repeat several times and then switch sides.
- Alternatively, suppose you’re finding it too challenging to pinch. In that case, you can use the fingertips (see middle image above) to pin down any knots and laterally flex your neck to the opposite shoulder.
Massage Technique #4: Hook & Knead
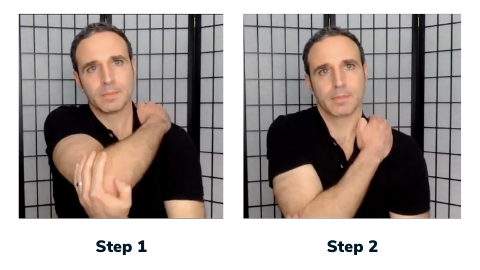
Step 1:
- Hook your fingertips on any tight knots you can feel on your upper traps.
Step 2:
- Dig your fingertips down and drag them forward and then release; pulling down on your elbow with the other hand helps to control the movement of your fingers.
- Move laterally from where the top of the shoulder meets the neck to the edge of the shoulders.
Switch sides.
Stretch #1: Chin Tucks
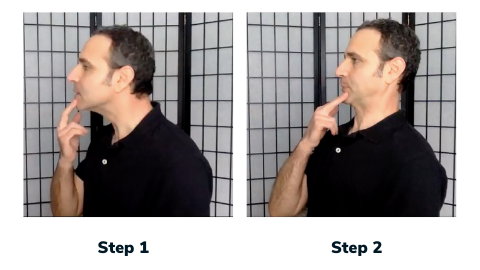
Chin Tucks are good for reversing forward head posture and strengthening the anterior neck muscles. Chin Tucks resemble a chicken head’s movement as it clucks.
Step 1:
- Use your index and middle fingers to guide you by placing them on your chin.
Step 2:
- Retract your neck and hold that position for 3 to 5 seconds.
- The more of a double chin you create, the better.
Repeat five times.
Stretch #2: Lateral Flexion
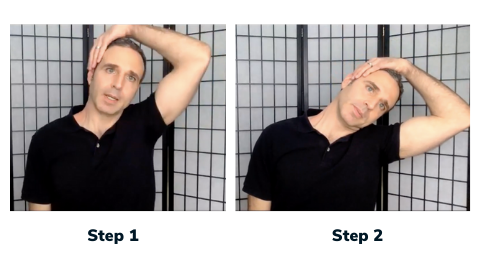
Step 1:
- Look straight ahead and begin with the chin tuck exercise, so your ears are aligned with your shoulders.
Step 2:
- Drape your hand over your ear, and pull your head down toward your shoulder.
- Hold for a few seconds and then release.
Repeat ten times and then repeat on the opposite side.
Stretch #3: Shoulder Squeeze with Neck Extension
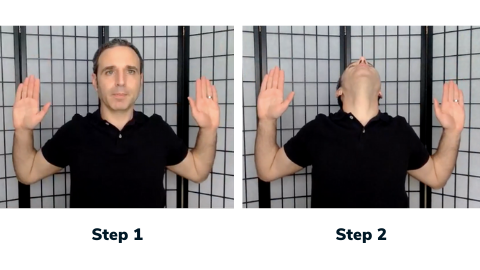
Step 1:
- Inhale and then Squeeze your shoulder blades together, forming the letter W with your arms.
Step 2:
- Extend your neck back by raising your chin, tilting your head backward, and looking up.
- You want to hold these two movements for about 3 to 5 seconds, and then you will exhale and do the forward curl with interlaced fingers.
Stretch #4: Forward Curl with Interlaced Fingers
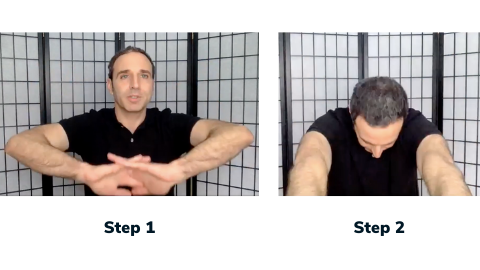
This exercise is a continuation of the last movement, so remember to exhale out through your mouth as you do it.
Step 1:
- Interlace your fingers so that your palms are facing away from you
Step 2:
- Extend your arms in front of you as you perform a forward curl, rounding your back and flexing your neck so your chin touches your chest.
- Stretch for 4-8 seconds.
Repeat 3-5 times.
Stretch #5: Seated Side Bend
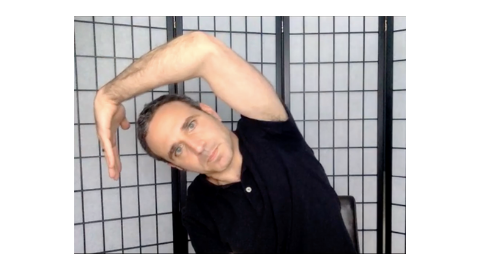
Step 1:
- Begin by placing your right palm on your left knee.
Step 2:
- Inhale, and as you exhale, reach your left hand over your head with your palm facing down. You should feel a stretch on the side of your torso.
Final Thoughts
Even though massage and stretching are my go-to recommendations for battling stiff necks, it’s essential to figure out the root cause of why you’re feeling your neck pain in the first place.
If you’re working from home, it could be that you’re constantly twisting and tilting your head down to look at the paperwork on your desk and then back up at the monitor, or maybe it’s because your monitor is too far away, and you need to strain your neck forward to see the screen.
Whatever it may be, I want to invite you to take my free self-assessment quiz to determine how much you know about setting up an ergonomic home office.
